
I am running VCF deployment on a single physical server, hence at some point in time I will run out of resources, at that point I will switch to deployment of VCF using VLC, VLC is the VMware Cloud Foundation Lab Constructor designed for professionals like us who wants to test product but can be limited due to physical resources. I am doing it old fashion way just to demonstrate how deployment would happen in real world, however VLC would actually be better to test the product. In case you do not have resources to test it at your ease no need to get disheartened, you can use simulation to learn.


Now the question is how do we make our hosts ready with the right version of ESXi host? I will answer that in a while. So before getting our host ready lets move forward with downloading cloud builder VM OVA , VMware Cloud Builder is a virtual appliance that is used to deploy and configure the first cluster of the management domain and transfer inventory and control to SDDC Manager. That is the first element of the cloud foundation deployment.

Once you have downloaded the OVA, deploy that appliance on you physical ESXi host in the management network, IP address you must have already selected at the time of filling up the Planning & preparation workbook.

New wizard will open, select the second option deploy a virtual machine from an ovf or OVA file.
Select the OVA file which we downloaded from Vmware portal. provide the name finalized in planning.
Select datastore to host the Cloud builder appliance.

Agree the license agreement.
Choose the management network to deploy Cloud builder VM. Disk provisioning type.
Complete the appliance configuration details.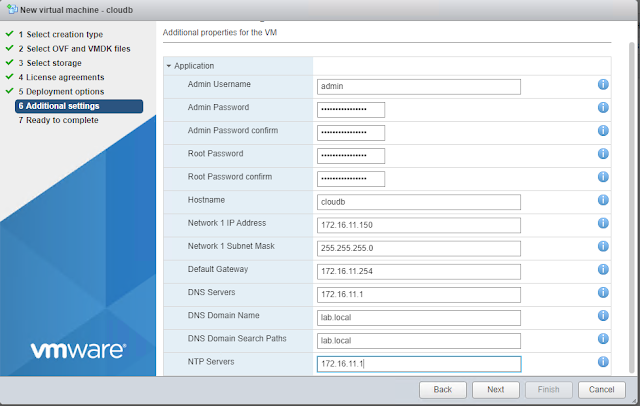
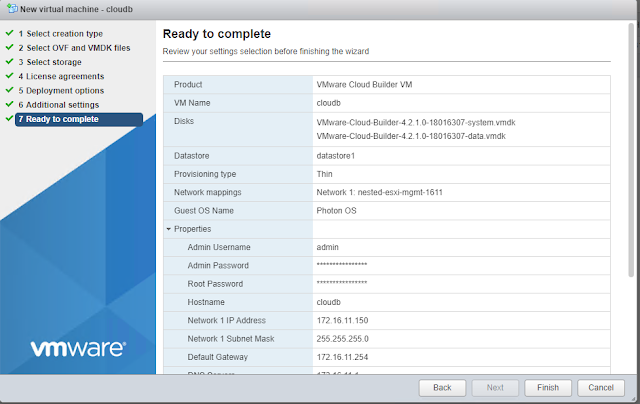
Finally review the settings and deploy the appliance.
Once appliance is deployed and powered on, wait for 10 minutes before we start next step, so its a good time to bring a cup of coffee or tea.

Fill details and click on login, you will get the cert warning accept that.
Click two times on highlighted icon.
Double click on highlighted directory "mnt".
Double click on ISO directory.
Double click on sddc foundation bundle folder.
Double click on esx-iso. This is the image we need for our ESXi server, select the image and hit download button.
Once ISO is downloaded, start preparing nested ESXi, if you are unsure about the steps then please refer my previous post Home Lab Step-by-Step Part-6-Nested-ESXi.

As its using a self signed cert, click on advanced and proceed to the page.
Login with admin credentials, which we configured at the time of the deployment of the appliance. Agree the agreement and click "Next"
We will select the option, VMware cloud foundation, as the second option is specifically available for Dell EMC VxRail. You cant successfully deploy cloud foundation if any of the requirement is not fulfilled. Hence would recommend downloading the Pre-req and making sure all the pre-reqs are completed.
 Actually we are not starting the deployment yet, these steps are required to download the deployment parameter sheet. We need to populate the information on this sheet from planning and preparation workbook we have filled initially in this post.
 After downloading the file, you can close this window, and we will come back to cloud builder once all pre-reqs are ready.

Please fill in the license details in this sheet.

In the next sheet populate password for the workloads, keep password policy in mind.
Populate host and network details.
Finally fill in the deployment parameters and our deployment workbook is ready.
If you have checked my post about virtual router you would be able to recall that BGP is not enabled on it. Hence now is a good time to enable that.

Enable BGP router using these comands.

Now set the password for the session using below commands.

Exit the configure terminal.

Change the policy to start and stop with host, and provide the NTP server address.

Now move to services tab find SSH service and change the startup policy to start and stop with host.

Now move to manage>>networking >>TCPIP stack to add the domain details .
Add the domain name and search domain details.
 Follow the same steps on all hosts and reboot, after reboot SSH and NTP service should be started and time sync should be complete.

Now as management workload domain gets configured with vSAN we need to mark our HDD as flash disk, in my post home-lab-step-by-step-part-10-vsan-7 we did this action from GUI as hosts were added in to the vCenter, however on a stand alone host that option is not available in GUI hence we need to mark HDD as flash using command line.

Now we need to re-generate the host certificates as originally certificates are issued with the name localhost, which is a mismatch with the actual host name.
Navigate the /etc/vmware/ssl directory and run the command "/sbin/generate-certificates" to generate the certificate with updated name. Run it on all the hosts and reboot one more time to allow cert to take effect. Post reboot, validated the updated cert is in use. Now we will start cloud foundation deployment.
Login to cloud builder VM, and follow the wizard, this time we will continue from where we left on Cloud builder, download deployment workbook page.
Move to the next page and confirm the workbook has been completed and ready.
Click next and upload the file we have filled with details.

Once you click next, it will start the validation process, wait for it to complete. If you want to view the live logs for validation and SDDC bring-up process, SSH to cloud builder appliance, run command:

Once Validation process is complete move next to start the actual deployment.
Once you click next it will give you the warning telling once started this process can not be stopped. Press deploy SDDC.
Now the bring-up process has started. This is a time consuming task hence now you can go ahead and get another cup of coffee or tea. But keep an eye on the setup once in 15 min to be aware if there is any error stops the bring up process.
 There is one thing which I found interesting in VCF that vSAN is enabled even before vCenter is deployed. 😃 As its 3 am I heading to sleep and will check the status once I wake up.

Due to which, nested ESXi and cloudb appliance entered suspend state, got the message that no space left on the vmfs volume and I can retry after making some space free. This is something which most of the infra admins have faced in their tenure, however as I was running nested ESXi and vCenter was running on vSAN datastore, vCenter became inaccessible.

So to fix the emergency mode issue, I ran few commands from the vcenter console.
e2fsck -y /dev/sda2
 Just to validate if everything is back on track I logged in to the vCenter, and found it to be deploying the required components from exactly where it left.
I wouldn't recommend you to make any changes or configuration on vCenter, you just monitor the task progress, as it may lead to another set of issues if you may do config changes directly.


So, I decided to power off the cloud builder VM which will give time to NSX-T managers to power on, I am just testing if that would actually start the bring up process from same stage or not.
 We powered off the cloud builder at the NSXT deployment task, and post power on it has brought us exactly at the same task but showing as failed, now we will retry the bring-up process.
 As I was hoping, it did exactly same, as its a nested environment. It took time for NSXT managers to complete the initial startup process, however cloudbuilder timeout use to happen even before the managers can start, hence it was deleting them and starting reinstall thinking the installation was corrupt. as we stopped the builder VM, hence paused the bringup process, we were able to complete this task which was failing earlier.
 We got this working but still couldn't believe so I have logged in to one of the NSXT manager in GUI, may be something is happening at the background, all I could see is 1 management node, I just looked at the console, as didn't want to interrupt the process.

After waiting for 30 minutes, I checked again (couldn't stop myself), and now it shows that number of managers as 3 means, it has formed a cluster.
As bring up process is still running, I am ok to see it even with the errors/warnings.
In version 4.0, Bring-up fails during the step Configure NSX-T Transport Node Action, it was a known issue, hence when it got stuck at the same step for good amount of time, I logged into NSX DC and found satisfactory status.

Finally we successfully moved to our next quest, installation of SDDC manager.

And now we have another error, for SDDCM deployment.
After looking at the logs it again looks like an issue because of nested deployment, so I will just retry without making any changes.
Well, it did work SDDCM appliance got deployed, now we will keep an eye on the progress. Now we got another error which stopped the bringup.
 Now we have reached a point where all physical resources are depleted and vCenter is crashing, physical CPU and Memory utilization is beyond 98%.
vCloud foundation 4.2.1 is made up of below listed VMware products and versions. I would recommend you to check out the BOM for VCF 4.2.1
Reading the release notes will give you clear picture on the licensing requirement for the suite. Cloud foundation license will cover these products.
- SDDC manager
- VMware ESXi
- VMware vSAN
- VMware NSX-T Data Center
SDDC manager is the software which will deploy set of VMware products for us in our cloud foundation SDDC.
vCenter server license needs to be procured separately, however one license is enough for all vCenters deployed for separate workload domains.
While planning for the real world VCF design and deployment, you need to know the maximums supported by the release.
In order to start I would recommend downloading planning and preparation workbook from VMware. complete the workbook as per the Low Level Design agreement. This is very important as it will save you from forgetting some tiny detail which can actually affect the deployment.
Once you have completed the workbook and validated the pre-reqs for VCF such as network vlans availability, licenses etc. In our case we configured network in our previous post home-lab-step-by-step-part-3-networking And DNS & NTP was configured in the post Home Lab Step-by-Step Part-5-Infrastructure Services, make sure we have created all required host A and ptr records in DNS database.
So in order to start with the lab we need to make sure we have ESXi hosts build with the version mentioned in the cloud foundation BOM. In this case our ESXi hosts needs to be 7.0 Update 1d Build number 17551050. However, we do not have this build available for download on vmware product download page.
Now the question is how do we make our hosts ready with the right version of ESXi host? I will answer that in a while. So before getting our host ready lets move forward with downloading cloud builder VM OVA , VMware Cloud Builder is a virtual appliance that is used to deploy and configure the first cluster of the management domain and transfer inventory and control to SDDC Manager. That is the first element of the cloud foundation deployment.
Once you have downloaded the OVA, deploy that appliance on you physical ESXi host in the management network, IP address you must have already selected at the time of filling up the Planning & preparation workbook.
After login on to the physical ESXi host, navigate to Virtual machines and right click, select create/register virtual machine option.
New wizard will open, select the second option deploy a virtual machine from an ovf or OVA file.
Select datastore to host the Cloud builder appliance.
Agree the license agreement.
Choose the management network to deploy Cloud builder VM. Disk provisioning type.
Finally review the settings and deploy the appliance.
Once appliance is deployed and powered on, wait for 10 minutes before we start next step, so its a good time to bring a cup of coffee or tea.
Hope you remember, that I left one question for later "how we will get the correct build hypervisor image?". Well now I am ready to answer that question. As cloud builder is the medium thru which we deploy our first workload domain "Management", it has an ISO repository, we will extract the correct build ISO from there in real world you have two options.
- Extract ISO from cloud builder and patch it with OEM drivers.
- Install OEM image which is one version less than the one listed in cloud foundation BOM and patch it to get the image to required build number.
As we are using nested ESXi we will use image extracted from cloud builder VM.
To extract the iso image, we need winscp software. Launch Winscp and you will get the login screen
Fill details and click on login, you will get the cert warning accept that.
Click two times on highlighted icon.
Double click on highlighted directory "mnt".
Double click on ISO directory.
Double click on sddc foundation bundle folder.
Double click on esx-iso.
Once ISO is downloaded, start preparing nested ESXi, if you are unsure about the steps then please refer my previous post Home Lab Step-by-Step Part-6-Nested-ESXi.
After completing nested hosts installation, access the cloud builder VM using browser https://"Cloudbuildervmname"
As its using a self signed cert, click on advanced and proceed to the page.
Login with admin credentials, which we configured at the time of the deployment of the appliance. Agree the agreement and click "Next"
We will select the option, VMware cloud foundation, as the second option is specifically available for Dell EMC VxRail.
Verify all pre-reqs and mark them verified.
Please fill in the license details in this sheet.
In the next sheet populate password for the workloads, keep password policy in mind.
Populate host and network details.
Finally fill in the deployment parameters and our deployment workbook is ready.
If you have checked my post about virtual router you would be able to recall that BGP is not enabled on it. Hence now is a good time to enable that.
Login to your CSR1000v router and enter into configure terminal using commands
csr-01a#en
csr-01a#config t
Enter configuration commands, one per line. End with CNTL/Z.
csr-01a(config)#
csr-01a(config)#
Enable BGP router using these comands.
csr-01a(config)#router bgp 65001
csr-01a(config-router)#redistribute connected
csr-01a(config-router)#neighbor 172.27.11.2 remote-as 65003
csr-01a(config-router)#neighbor 172.27.11.3 remote-as 65003
csr-01a(config-router)#neighbor 172.27.12.2 remote-as 65003
csr-01a(config-router)#neighbor 172.27.12.3 remote-as 65003
In real world you do not use redistribute connected command, but use network x.x.x.x mask x.x.x.x command for more deterministic routing.
Now set the password for the session using below commands.
csr-01a(config-router)#neighbor 172.27.12.3 password 0 VMw@re1!
csr-01a(config-router)#neighbor 172.27.12.2 password 0 VMw@re1!
csr-01a(config-router)#neighbor 172.27.11.2 password 0 VMw@re1!
csr-01a(config-router)#neighbor 172.27.11.3 password 0 VMw@re1!
Exit the configure terminal.
Now login to the ESXi hosts one by one and change the start up policy of SSH and NTP.
Login to host, navigate to manage>>Time and date>>edit NTP settings
Change the policy to start and stop with host, and provide the NTP server address.
Now move to services tab find SSH service and change the startup policy to start and stop with host.
Now move to manage>>networking >>TCPIP stack to add the domain details .
Add the domain name and search domain details.
Now navigate to networking>>portgroups>>select VM network >>choose edit, assign management vlan id.
After reboot validated and the time was showing correct, synced with NTP.
Now as management workload domain gets configured with vSAN we need to mark our HDD as flash disk, in my post home-lab-step-by-step-part-10-vsan-7 we did this action from GUI as hosts were added in to the vCenter, however on a stand alone host that option is not available in GUI hence we need to mark HDD as flash using command line.
Please use below mentioned commands on every host, and keep that in mind that this is only needed in nested environment or if suggested by VMware GSS team.
esxcli storage nmp satp rule add -s VMW_SATP_LOCAL -d mpx.vmhba1:C0:T1:L0 -o enable_ssd
esxcli storage nmp satp rule add -s VMW_SATP_LOCAL -d mpx.vmhba1:C0:T2:L0 -o enable_ssd
esxcli storage nmp satp rule add -s VMW_SATP_LOCAL -d mpx.vmhba1:C0:T3:L0 -o enable_ssd
esxcli storage core claiming reclaim -d mpx.vmhba1:C0:T1:L0
esxcli storage core claiming reclaim -d mpx.vmhba1:C0:T2:L0
esxcli storage core claiming reclaim -d mpx.vmhba1:C0:T3:L0
Now we need to re-generate the host certificates as originally certificates are issued with the name localhost, which is a mismatch with the actual host name.
Navigate the /etc/vmware/ssl directory and run the command "/sbin/generate-certificates" to generate the certificate with updated name.
Login to cloud builder VM, and follow the wizard, this time we will continue from where we left on Cloud builder, download deployment workbook page.
Move to the next page and confirm the workbook has been completed and ready.
Click next and upload the file we have filled with details.
Once you click next, it will start the validation process, wait for it to complete.
sudo -s
cd /opt/vmware/bringup/logs/
tail -f vcf-bringup.log
You would get the live logs in front of you.
If you want more detailed logs, then you should look into the debug logs using the command "tail -f /opt/vmware/bringup/logs/vcf-bringup-debug.log"
Once Validation process is complete move next to start the actual deployment.
Once you click next it will give you the warning telling once started this process can not be stopped. Press deploy SDDC.
Now the bring-up process has started. This is a time consuming task hence now you can go ahead and get another cup of coffee or tea. But keep an eye on the setup once in 15 min to be aware if there is any error stops the bring up process.
Good Morning, I left the deployment to run over night, and now I found list of issues as storage on my physical host datastore ran out of space.
Due to which, nested ESXi and cloudb appliance entered suspend state, got the message that no space left on the vmfs volume and I can retry after making some space free. This is something which most of the infra admins have faced in their tenure, however as I was running nested ESXi and vCenter was running on vSAN datastore, vCenter became inaccessible.
To fix this I made some space on the datastore 😋 of course , and then rebooted all nested esxi, along with restarted cloud builder appliance. Now post that I logged in to the ESXi which was hosting vCenter appliance and powered it on. But it wasn't that easy, due to all the mess I ran into due to no disk space on DS, vCenter entered into emergency mode. This the same issue I faced in one of the deployment I was doing at a customer site few years back, so I just jumped into the solution.
So to fix the emergency mode issue, I ran few commands from the vcenter console.
/bin/sh
/bin/mount
blkid (This command shows all disks connected to vCenter, I was focusing on ext4 disks)
e2fsck -y /dev/sda2
e2fsck -y /dev/sda3
After running file system check, I rebooted the vCenter and started the bringup process again.
I wouldn't recommend you to make any changes or configuration on vCenter, you just monitor the task progress, as it may lead to another set of issues if you may do config changes directly.
Now we again have to wait, for this bring-up process to complete.
Well I was hoping it to be smooth ride after all the issues we faced so far, but now we again hit a road block. We are stuck in a loop, and just now I noticed that NSXT manager deployment gets complete, but by that time task in cloud builder gets timedout which results in deletion of our deployed managers appliances.
I couldn't check the progress and now after a day I am login onto the LAB environment, I will now power on the Cloud builder VM, and lets see if now it moves ahead. But before that, I logged in to one of the NSXT manager deployed by the cloud builder to check the status, and cluster status is showing all components up and stable which is a good sign.
After waiting for 30 minutes, I checked again (couldn't stop myself), and now it shows that number of managers as 3 means, it has formed a cluster.
As bring up process is still running, I am ok to see it even with the errors/warnings.
In version 4.0, Bring-up fails during the step Configure NSX-T Transport Node Action, it was a known issue, hence when it got stuck at the same step for good amount of time, I logged into NSX DC and found satisfactory status.
Finally we successfully moved to our next quest, installation of SDDC manager.
And now we have another error, for SDDCM deployment.
After looking at the logs it again looks like an issue because of nested deployment, so I will just retry without making any changes.
Well, it did work SDDCM appliance got deployed, now we will keep an eye on the progress.
Now is the time I scrap this deployment and start with vLC. But the good part is we completed almost complete deployment, only part which was left was SDDCM config, Edge nodes creation and BGP pairing for application virtual networks.
I would conclude this post here, and in my next post I will start VCF deployment using VLC.
I hope I was able to add value, if your answer is yes, then don't forget to share and subscribe. 😊
If you want me to write on specific content or you have any feedback on this post, kindly comment below.
If you want, you can connect with me on Linkedin, and please like and subscribe my youtube channel VMwareNSXCloud for step by step technical videos.


Please share the link for VCF deployment using VLC
ReplyDeletehttps://www.vmwarensxcloud.com/2021/07/home-lab-step-by-step-vcf-421-install.html
DeletePradhuman, once we build cloud builder can we deploy all other solutions manually and then attached to SDDC mangager
ReplyDeleteDear Vishwajit,
ReplyDeleteVCF is a bundled suite which is completely based on VVD, hence you can install vRealize components in VCF aware or non aware node however integration is automatically done once deployed using LCM.
Cloud builder first deploys VC and NSX-T managers before SDDC manager and completes integration.
It is not advised to deploy solutions manually as it defeats the purpose of the product itself. I hope it makes sense.
Thank you, do you have any materials that talk about VMware Cloud Foundation types of bundles for Install bundle management?
ReplyDelete